
Let’s build a ChatGPT plugin for searching for information on your website. Such a plugin may be helpful if you want to provide ChatGPT with knowledge about your business, for example, when you want to use AI as an onboarding assistant for your company or build a customer support chatbot.
Table of Contents
- What do you need to build a ChatGPT plugin?
- Building blocks of the ChatGPT plugin
- Implementing the backend service
- How to connect a plugin to ChatGPT
- How to test the plugin
What do you need to build a ChatGPT plugin?
To build the plugin with the search functionality, we need to:
- provide the ChatGPT plugin configuration files
- build a backend service for the plugin
- create a function for retrieving the search results from a vector database
- populate the vector database with the relevant data
I have already written an article about using a vector database with a GPT model. In this article, I assume you have created the database and populated it with the data. Additionally, I expect you have implemented a function that takes the results returned by the vector database and passes them to a GPT model to generate a summary of the relevant page. I described how to do it in the article mentioned above.
Building blocks of the ChatGPT plugin
A ChatGPT plugin requires a manifest file. The manifest file is a JSON file adhering to the ChatGPT plugin specification. The file describes what the plugin does and how it should be used. For example, we can define a plugin like this:
{
    "schema_version": "v1",
    "name_for_human": "Search on mikulskibartosz.name",
    "name_for_model": "find",
    "description_for_human": "Plugin for searching information on mikulskibartosz.name website.",
    "description_for_model": "Plugin for searching information on mikulskibartosz.name website.",
    "auth": {
      "type": "none"
    },
    "api": {
      "type": "openapi",
      "url": "http://localhost:5000/openapi.yaml",
      "is_user_authenticated": false
    },
    "logo_url": "https://www.mikulskibartosz.name/images/logo.jpg",
    "contact_email": "the email address where OpenAI can complain about your plugin",
    "legal_info_url": "a link to your privacy policy etc."
  }
In the file, we had to specify the plugin name and description. Both fields are used twice because we have to provide the information for a human who adds the plugin to their ChatGPT session and the model. Both fields are required and should describe what the plugin does. The auth field describes how the plugin should be authenticated. In our case, we don’t need any authentication, so we set the type field to none. The api field describes how to use the plugin. In our case, we use the OpenAPI specification to describe the plugin API. The API specification is the second configuration file we need to provide.
In the OpenAPI specification, we have to define the endpoints supported by the plugin. We need to describe what the endpoint does, its parameters, and the response. In my example, I defined one endpoint:
openapi: 3.0.1
info:
  title: Find information on mikulskibartosz.name website
  description: Plugin for searching information on mikulskibartosz.name website.
  version: 'v1'
servers:
  - url: http://localhost:5000
paths:
  /find:
    get:
      parameters:
        - name: query
          in: query
          description: The query to search for.
          required: true
          schema:
            type: string
      operationId: findArticles
      summary: Get a summary of an article.
      responses:
        "200":
          description: OK
          content:
            application/json:
              schema:
                $ref: '#/components/schemas/findResponse'
components:
  schemas:
    findResponse:
      type: object
      properties:
        summary:
          type: string
          description: A summary of the most relevant article.
From this specification, the model will figure out the endpoint URL and what parameters it needs to send. AI will also use the content description to understand the data received from the endpoint.
Implementing the backend service
In the backend service, we have to import the Flask library and create a new application. I won’t import the Flask-CORS library, so all of my endpoints have to handle CORS by themselves. You can shorten the code by using an additional dependency to handle the CORS headers.
from flask import Flask, jsonify, Response, request


app = Flask(__name__)
After the mandatory setup section, we have to implement three endpoints. Two of them will return the plugin configuration files. The third one is the endpoint defined in the OpenAPI specification.
Let’s start with the plugin manifest endpoint. We have to follow a naming convention. The endpoint URL must be /.well-known/ai-plugin.json. Because of CORS, we need to support the OPTIONS method in addition to GET. In the endpoint, we return the 204 No Content status code when ChatGPT sends a preflight request, and the manifest file when it sends a GET request.
@app.route('/.well-known/ai-plugin.json', methods=['GET', 'OPTIONS'])
def get_plugin_json():
    if request.method == 'OPTIONS':
        return ('', 204, {})

    with open('ai-plugin.json', 'r') as f:
        json_data = f.read()
        return Response(json_data, mimetype='text/json')
The second endpoint is the OpenAPI specification endpoint. The URL depends on the value we specified in the manifest file (in the api.url property). In my example, it is http://localhost:5000/openapi.yaml. The endpoint is similar to the previous one. We have to support the OPTIONS method and return the 204 No Content status code when ChatGPT sends a preflight request. When ChatGPT sends a GET request, the backend service returns the OpenAPI specification file.
@app.route('/openapi.yaml', methods=['GET', 'OPTIONS'])
def get_openapi_yaml():
    if request.method == 'OPTIONS':
        return ('', 204, {})

    with open('openapi.yaml', 'r') as f:
        yaml_data = f.read()
        return Response(yaml_data, mimetype='text/yaml')
Now, we can start implementing the plugin endpoints. In the OpenAPI specification, I defined only one endpoint — /find. The endpoint takes the query parameter and returns the summary in JSON format. In the implementation, I will call the answer function defined in the article about using a vector database to search for information and summarizing the results with a GPT model. The function delivers the answer and the URLs of the articles containing the answer. We will ignore the URLs and return only the answer.
@app.route('/find', methods=['GET', 'OPTIONS'])
def find():
    if request.method == 'OPTIONS':
        return ('', 204, {})

    query = request.args.get('query')
    the_answer, _ = answer(query)
    return jsonify({'summary': the_answer})
Finally, to make CORS work, we need an after-request handler that adds the required headers to the response:
@app.after_request
def add_cors_headers(response):
    response.headers['Access-Control-Allow-Origin'] = 'https://chat.openai.com'
    response.headers['Access-Control-Allow-Methods'] = 'GET, OPTIONS'
    response.headers['Access-Control-Allow-Headers'] = '*'
    return response
Obviously, we must run the application:
if __name__ == '__main__':
    app.run(port=5000, host='0.0.0.0', debug=True)
Remember to switch to a WSGI server before deploying the Flask application to production.
How to connect a plugin to ChatGPT
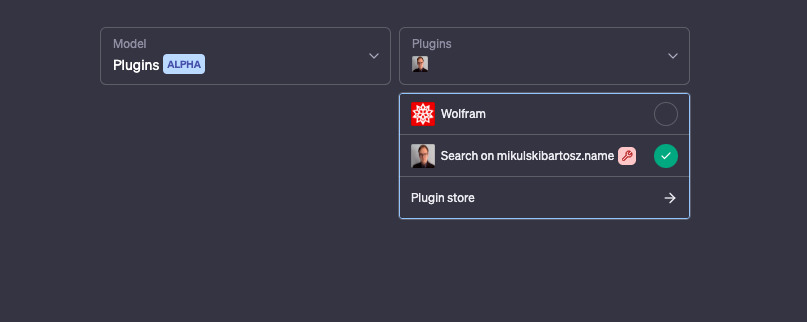
Now, we are ready to connect the plugin to ChatGPT. We have to open the ChatGPT website, open a new conversation, and switch the model to Plugins. In the Plugins menu, we click the Plugin store and select the Develop your own plugin option. We’ll see a window asking us to enter the website domain. It’s the domain of the backend service. For testing the endpoints locally, we can use http://localhost:5000 (HTTPS is mandatory for production deployments).
When we click the Find manifest file button, we should see a confirmation screen:
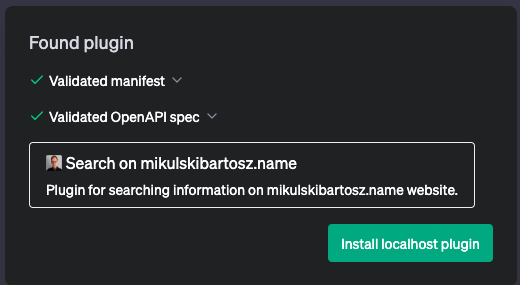
After checking that the confirmation window displays the correct information from the plugin manifest, we have to click the Install localhost plugin. In the ChatGPT conversation window, we can open the plugins menu and check whether the plugin is active. We can activate as many plugins as we want.
How to test the plugin
Finally, we are ready to use the plugin. To test whether our plugin works, it’s best to instruct the model to find the information explicitly. Otherwise, AI may try to answer the question without using the plugin. If the ChatGPT model ignores the plugin, try rephrasing the question.
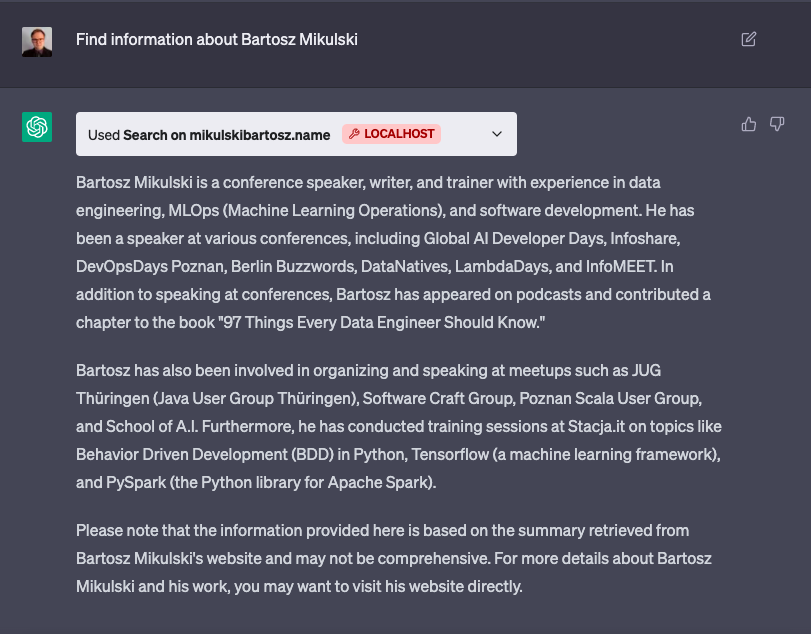
Remember that, in the debug mode (the debug mode is active if you installed the plugin using the Develop your own plugin option), you can click the arrow in the plugin block and see the actual query sent by ChatGPT and your server response. Of course, you can also log requests/responses in the backend service.
Go From AI Janitor to AI Architect
Stop debugging unpredictable AI systems. I can help you build, measure, and deploy reliable, production-grade AI applications that don't hallucinate.
Message me on LinkedIn